Introduction
In a 3D application, implementing the camera control is an indispensable step for offering interactive and intuitive content.
It’s a step that can be natively complicated, but luckily the official Three.js add-ons provides up with specialized classes in this subject !
Today, we will study two of these classes : OrbitControls and its alternative, MapControls.
OrbitControls and MapControls classes
As explained earlier, these two classes are available in the official Three.js add-ons, so you can easily import them into your code :
import { OrbitControls } from '../js/examples/jsm/controls/OrbitControls.js';
// or
import { MapControls } from '../js/examples/jsm/controls/OrbitControls.js';
As you may have noticed, these two classes are declared in the same module. MapControls is a bypass of OrbitControls; these two classes are therefore very close !
Functions and Differences between the Classes
The latters propose two principal functions :
- A movement of the camera on the X and Z axes.
- A camera rotation around a fixed point – placing the camera into orbit around the target.

These two functionalities are usable with a mouse or a tactile screen !
In the case of OrbitControls, the rotational action will be controlled by the main ( left) mouse button – or by a finger on the touchscreen. The secondary button of the mouse (right) controls the camera’s displacement actions – This is also possible with two fingers on the touchscreen.
The order of these actions is inverted on MapControls; this is the main difference between these two classes !
In these two cases, it is possible to zoom with the scroll wheel of the mouse or by pinching the touchscreen !
Basic application of these classes
The examples of this part are centered around OrbitControls, but the practical application is totally identical for MapControls !
In our JavaScript code, let’s import OrbitControls :
import { OrbitControls } from '../js/examples/jsm/controls/OrbitControls.js';
Next, in our Three.js application, let’s create a controls global variable :
var controls = undefined;
Then, during the initial setup of the Three.js environment, let’s initialize our controls variable with an OrbitControls instance :
// ---------------- CAMERA CONTROLS ----------------
controls = new OrbitControls( camera, renderer.domElement );
From now on, with these three steps, you should be able to control the camera in your scene with the help of the mouse or the tactile screen!
Advanced application of these classes
Many customization options are available to us, in this second part, we will study the main ones !
Here, the examples are targeted on MapControls, but these options are also valid for OrbitControls.
Deactivating a feature
As explained earlier, OrbitControls and MapControls propose two camera control features. It is possible to disable them, to forbid the user to perform certain actions.
If we want to enable or disable the camera movement, we use the enablePan property :
// ---------------- CAMERA CONTROLS ----------------
controls = new MapControls( camera, renderer.domElement );
controls.enablePan = false;
If we wanr to enable or disable the camera rotation, we use the enableRotate property :
// ---------------- CAMERA CONTROLS ----------------
controls = new MapControls( camera, renderer.domElement );
controls.enableRotate = false;
Rotational Constraints
In some cases, it is also interesting to be able to limit the user’s actions without completely disabling a feature.
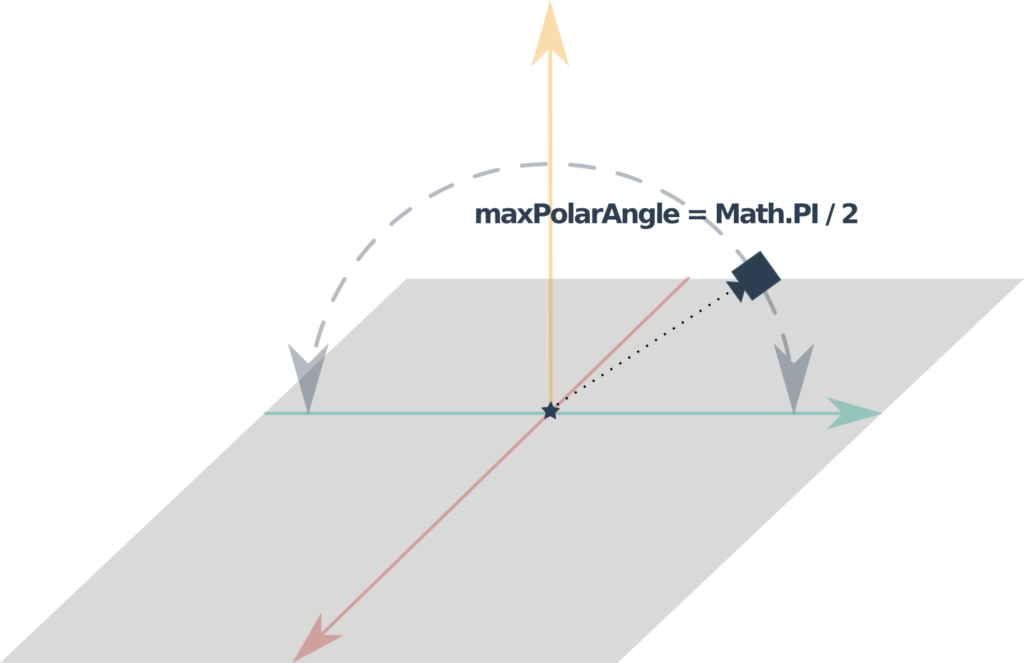
For example, in the case of rotation, it is possible to define a maximum angle of orientation for the camera. In this example, we use the maxPolarAngle property to define a maximum camera tilt :
// ---------------- CAMERA CONTROLS ----------------
controls = new MapControls( camera, renderer.domElement );
controls.maxPolarAngle = Math.PI / 2;

Thus, observing the scene from a low-angle camera is now impossible.
Zoom Constraints
Just like the inclination in the previous paragraph, it is also possible to constrain the zoom of our camera.
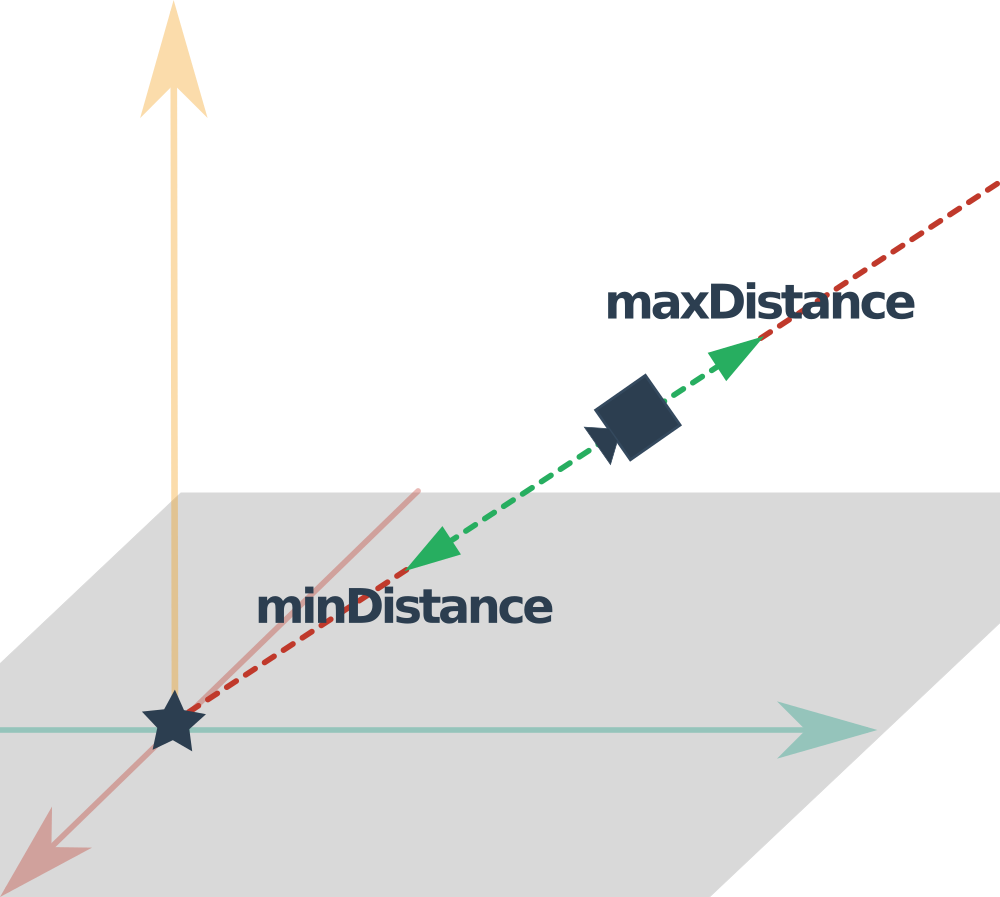
For this, we use two properties :
minDistance– Minimum distance between the camera and its targetmaxDistance – Maximum distance between the camera and its target

minDistance and maxDistance// ---------------- CAMERA CONTROLS ---------------- controls = new MapControls( camera, renderer.domElement ); controls.minDistance = 2; controls.maxDistance = 20;
Inertia and progressive deceleration of the camera
The user experience is essential ! It is possible to make the movement of our camera smoother and more fluid by making it lose speed gradually.
For this, we use the properties enableDamping and dampingFactor :
// ---------------- CAMERA CONTROLS ----------------
controls = new MapControls( camera, renderer.domElement );
controls.enableDamping = true;
controls.dampingFactor = 0.05;
You can adjust the dampingFactor value to make the deceleration faster or slower.
To finish the activation for this option, it is necessary to call the update method in our main animation loop :
function render()
{
    controls.update();

    renderer.render( scene, camera );
    requestAnimationFrame( render );
}
Conclusion
Intuitive camera control is key to providing a quality user experience.
From now on, moving the camera in a Three.JS scene is no longer a secret to you!
Feel free to download the complete Three.js University guide to progress even faster !
We still have a lot to learn about camera control, but you can become an expert on the topic with Chapter 8 of the downloadable guide !
In addition to OrbitControls and MapControls that I have just presented, you will discover many other control classes and their properties !

You can download the complete guide here :


[…] Easily moving the Three.JS camera with OrbitControls and MapControls […]
[…] thomassifferlen 1 commentaire Available in English […]