
Using animated 3D objects in a Three.js scene is an important step to make your world more alive and offer a unique experience. But, until now, we haven’t discussed animations.
It is this feature that will allow us to animate the 3D structure of an object in the scene.
In this new publication, we will learn how to use animations of a 3D model, thanks to the AnimationMixer class of Three.js !
The Animations and Three.js
Generally speaking, in the world of 3D modeling, there are several methods for animating a 3D object.
Three.js supports skeleton animation, and it is this very versatile type of animation that we will explore in this publication.
This chapter only deals with the use of animations included in a 3D object loaded from a GLB / GLTF file. Creating and animating a 3D object from a modeling tool requires other skills !
If you want more information on the subject of loading GLB / GLTF files :
If you want more information about loading GLB / GLTF files :
Import and animate a 3D model in Three.js
As explained above, to animate a 3D model in the scene, we will use the AnimationMixer class. For the purpose of this example, I will use the 3D model of the character from the introduction video.
Let’s start by creating some global variables in our JavaScript code :
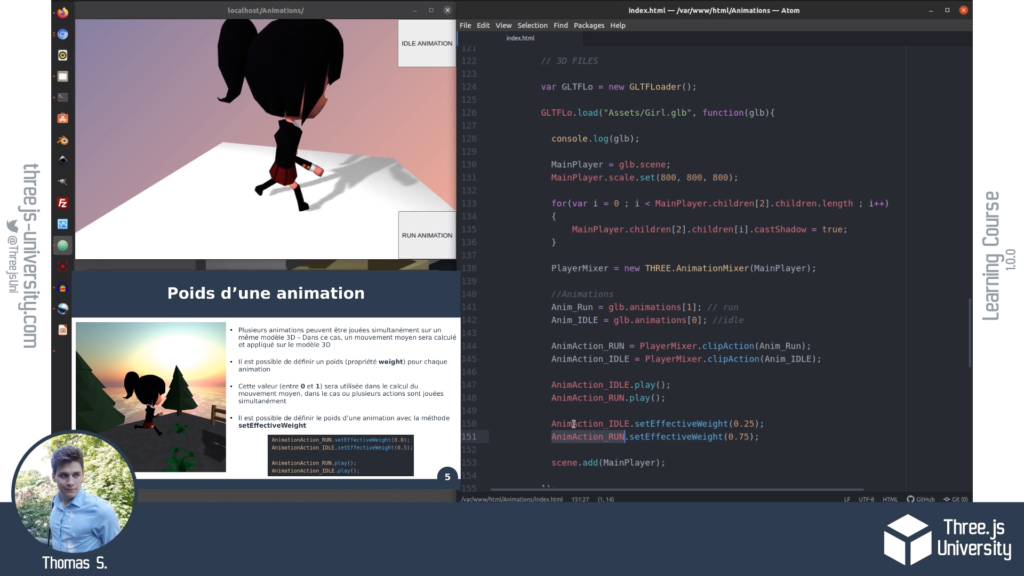
mixer– Our instance ofAnimationMixer.Player_anim_IDLE– The resting (inactive) animation of our example character.Player_anim_RUN– The running animation of our example character.
It is necessary to create one variable for every animation of your 3D model – In my case, two variables.
var mixer                = undefined;     // Three.JS AnimationMixer
var Player_anim_IDLE     = undefined;    // Animation IDLE
var Player_anim_RUN      = undefined;    // Animation RUN
In this example, we will use a 3D model loaded from a GLB file. This type of file is ideal for animated models, I strongly advise you to use it !
So, when the 3D model we wish to animate is loaded, let’s initialize the mixer variable with an instance of the AnimationMixer class :
var loader = new GLTFLoader();
loader.load( '../Players_NPC/Girl.glb', function ( gltf )
{
    // ---------------- ANIMATIONMIXER----------------
    mixer = new THREE.AnimationMixer( gltf.scene );

    [...]
}
The AnimationMixer constructor requires only one parameter : The 3D object to animate.
As a reminder, the loaded 3D object must natively include a skeleton (
Bonetree ) and animations !
Be careful! It’s important to understand that it is necessary to create an instance of AnimationMixer by objects to be animated. An AnimationMixer variable can only manage one object at a time !
Then, let’s get the animations loaded from the GLB file :
//Anims
Player_anim_IDLE = gltf.animations[ 0] ; // first animation
Player_anim_RUN  = gltf.animations[ 1] ; // second animation
When it is done, it is now possible to play an animation ! To do this, we use the play method. Note that it is possible to stop an animation with the equivalent stop method.
We choose to run the Player_anim_IDLE animation :
mixer.clipAction( Player_anim_IDLE).play();
Finally, it is necessary to update the animation according to the elapsed time. To do this, we use the update method of our mixer variable in the main loop of our code :
var delta = clock.getDelta();
mixer.update( delta );
Don’t forget to make sure everything is loaded correctly before calling the
updatemethod ! You can, for example, use a simpleif(mixer).
Note that it is possible to use SkeletonHelper to debug the armature of our 3D model. You can find an example of use of this class in the following publication :
Conclusion and Final Code
To close this publication, here is our final code for the animation of a 3D object :
var mixer                = undefined;     // Three.JS AnimationMixer
var Player_anim_IDLE     = undefined;    // Animation IDLE
var Player_anim_RUN      = undefined;    // Animation RUN
var MainPlayer           = undefined // Mesh

[...]
var loader = new GLTFLoader();
loader.load( '../Players_NPC/Girl.glb', function ( gltf )
{
    // ---------------- ANIMATIONMIXER----------------
    mixer = new THREE.AnimationMixer( gltf.scene );

    //Anims
    Player_anim_IDLE = gltf.animations[ 0] ; // first animation
    Player_anim_RUN  = gltf.animations[ 1] ; // second animation

    mixer.clipAction( Player_anim_IDLE).play();

    //Mesh
    MainPlayer = gltf.scene;
    scene.add(MainPlayer);
}
[...]

function render()
{
  [...]

  var delta = clock.getDelta();
  mixer.update( delta );
}
Congratulations, you have successfully loaded and animated a 3D model in a Three.js scene !
Feel free to download the complete Three.js University guide to progress even faster !
Controlling animations in Three.js is a vast subject ! This article only covers the basics, but you can become a Three.js animation expert with Chapter 10 of the downloadable guide !
In addition to the basics I just presented, we will discover many ways to use animations (repetition rules, smooth transitions between two animations …) !
You can download the complete guide here :
[…] Control the animations of a 3D model in Three.js with AnimationMixer […]
[…] Control the animations of a 3D model in Three.js with AnimationMixer […]