
Before starting the setup of our project based on the utilization of Three.JS and Ammo.js coupled together, I suggest you read the introduction of this theme :
Introduction – The Physical world and the Graphic world
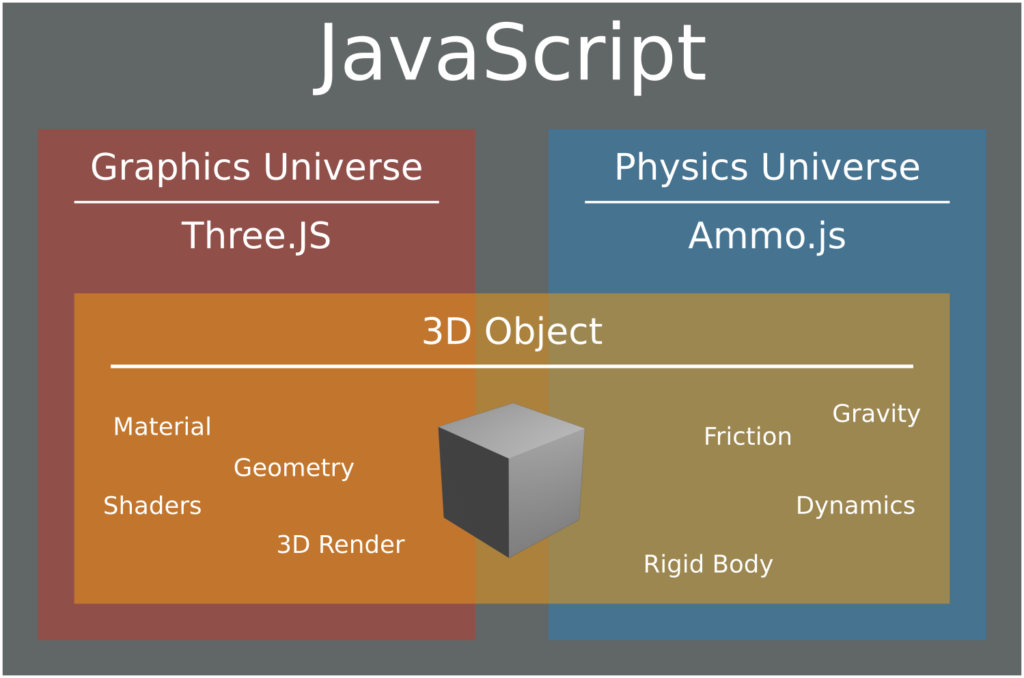
Firstly, it is very important to make the distinction between the physical and graphic world. When we use the Three.JS and Ammo.js duo, these two concepts work separately.
The physical world represents the simulated universe in which the physics engine calculates the interactions based on laws (collisions, gravity, resistance, friction… ). This dynamic simulation is managed by Ammo.js.
The graphic world includes the entirety of visual 3D rendering functionalities with which we have already worked in several articles in my blog. The 3D rendering is managed by Three.JS.
Setting up a Basic Environment
Let’s begin with the setup of a basic HTML / CSS environment :
<head>
    <meta name='viewport' content='width=device-width, initial-scale=1.0, maximum-scale=1.0, user-scalable=0' />

    <style>
        body
        {
            margin: 0; touch-action: none;
            background-image: -webkit-gradient(linear, 0 0, 100% 100%, color-stop(0, #877fa8), color-stop(100%, #f9ae91));
            background-image: -webkit-linear-gradient(135deg, #877fa8, #f9ae91);
            background-image: -moz-linear-gradient(45deg, #877fa8, #f9ae91);
            background-image: -ms-linear-gradient(45deg, #877fa8 0, #f9ae91 100%);
            background-image: -o-linear-gradient(45deg, #877fa8, #f9ae91);
            background-image: linear-gradient(135deg, #877fa8, #f9ae91);
        }

        canvas { width: 100%; height: 100% ; touch-action: none;}
    </style>
</head>

<body>
</body>
Next, in the head tag, let’s import the Ammo.js library and prepare a script tag module :
<script src="../js/ammo.js"></script>

<script  type="module">
    //code
</script>
To finish, import the Three.JS module into our script tag :
import * as THREE from '../js/build/three.module.js';
Our basic environment is now ready !
Configuration of Ammo.js and the Physics universe
Let’s begin by initializing the Ammo.js library in our JavaScript module. For this, let’s use the basic code shown below :
// ------ Ammo.js Init ------

Ammo().then( AmmoStart );

function AmmoStart()
{
    //code
}
The AmmoStart function will be executed when the Ammo.js library will be initialized. This function will be the entry point of our code.
Next, let’s create a physicsUniverse global variable :
// Ammo.js
var physicsUniverse     = undefined;
When this is done, let’s create an initPhysicsUniverse function destined to initialize our dynamic universe :
// ------ Phisics World setup ------

function initPhysicsUniverse()
{
    var collisionConfiguration  = new Ammo.btDefaultCollisionConfiguration();
    var dispatcher              = new Ammo.btCollisionDispatcher(collisionConfiguration);
    var overlappingPairCache    = new Ammo.btDbvtBroadphase();
    var solver                  = new Ammo.btSequentialImpulseConstraintSolver();

    physicsUniverse               = new Ammo.btDiscreteDynamicsWorld(dispatcher, overlappingPairCache, solver, collisionConfiguration);
    physicsUniverse.setGravity(new Ammo.btVector3(0, -75, 0));
}
Here are briefly several precisions on this code; this information is principally extracted from the original documentation of the Bullet physics engine :
btDefaultCollisionConfigurationconfigures the detection of collisions by Bullet (Ammo.js).btCollisionDispatchertakes charge of the algorithms that manage convex and concave collisions.- btSequentialImpulseConstraintSolver permits the resolution of constraints of physics rules in our universe (gravity, forces…).
btDiscreteDynamicsWorldcorresponds to our dynamic world; our variablephysicsUniverseis of this type.
And to finish, we have configured the gravity with a value of -75 on the Y axis, thanks to the setGravity method.
Ammo.js and our physics universe are now configured.
Configuring Three.JS and the Graphics Universe
Now, let’s occupy ourselves with our Three.JS graphics universe !
Let’s create an initGraphicsUniverse function :
// ------ Three.js setup ------

function initGraphicsUniverse()
{
    //code
}
Next, let’s create some global variables that we will initialize in initGraphicsUniverse :
// Three.js
var scene            = undefined ;
var camera            = undefined ;
var renderer             = undefined ;
var clock             = undefined ;
This part only concerns Three.JS and its basic concepts; normally it should seem more familiar to you. However, if this is not the case, I suggest you refresh your memory with this article :
In initGraphicsUniverse, let’s begin by creating our Three.JS clock :
clock = new THREE.Clock();
Next, let’s initialize our scene:
scene = new THREE.Scene();
Let’s follow through with our camera :
camera = new THREE.PerspectiveCamera( 60, window.innerWidth / window.innerHeight, 1, 1000 );
camera.position.set( -25, 20, -25 );
camera.lookAt(new THREE.Vector3(0, 6, 0));
Let’s continue with the rendering motor :
//renderer
renderer = new THREE.WebGLRenderer({antialias : true, alpha : true});
renderer.setPixelRatio(window.devicePixelRatio);
renderer.setSize(window.innerWidth, window.innerHeight);
document.body.appendChild(renderer.domElement) ;
And to finish, let’s light up our scene :
//light
var ambientLight = new THREE.AmbientLight(0xcccccc, 0.2);
scene.add(ambientLight);

var directionalLight = new THREE.DirectionalLight(0xffffff, 0.6);
directionalLight.position.set(-1, 0.9, 0.4);
scene.add(directionalLight);
Rigid Body and the Geometric structure of Collisions
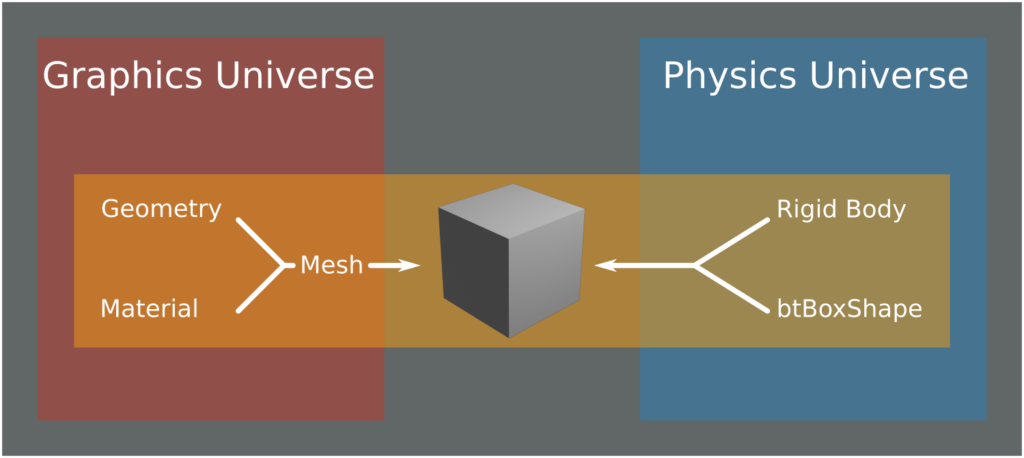
Let’s begin by defining certain concepts. We call Rigid Body all the entities of our physics universe subject to dynamic forces (having mass, a velocity and capable of entering a collision…).
It is therefore necessary to create Rigid Bodies in our physics universe in order to correctly simulate dynamic forces. For this, each 3D object (of the graphics universe) that we wish to include in the physics simulation will have its own Rigid Body (in the physics universe).
However, each 3D object of the simulation does not have the same form, and therefore does not react in the same manner as the physics. For example, it is easier to pile cubic Rigid Bodies than spherical ones !
This is why Rigid Bodies don’t all have the same geometric form. This is what we call the geometric structure of collision.
Let’s use a simple example : We wish to create a 3D cube that reacts to physics. On the graphics side we will create a Mesh composed of a Geometry of the BoxGeometry type and a Material. Next, on the physics side, create a Rigid Body with a cubic geometric structure of collision, of the type btBoxShape.
Let’s return to our code; let’s create a rigidBody_List global variable of the Array type. This latter will list all our Rigid Bodies.
var rigidBody_List = new Array();
Creating 3D objects in Graphics and Physics universes
As explained above, the graphics and physics universes operate separately. However, for each graphics 3D object that we wish to include in the dynamic simulation, we must create a physics object linked to it !
Configuration parameters and variables of the object
For this, let’s create a createCube function that will be charged with easily creating 3D cubes synchronized in the two universes.
This method necessitates two parameters :
Scale– A number representing the height of our cube.Position– AVector3type object containing the position of the cube on the three XYZ axes.Mass– The physical mass of our 3D object.Rot_quaternion– The initial rotation of our cube (Quaternion).
There are several practical online tools to easily visualize and convert quaternions !
function createCube(scale, position, mass, rot_quaternion)
{
    // code
}
In this createCube function, let’s create a quaternion variable that takes the value of the rot_quaternion parameter if the latter is defined ! If it is not, quaternion takes a default value.
We must create our 3D object in the two universes and make it from the values contained in parameters or variables that will simplify the task and limit code errors.
Creating in a graphics universe
Let’s begin by creating the 3D object in the graphics universe (Three.JS).
function createCube(scale , position, mass, rot_quaternion)
{
    let quaternion = undefined;

    if(rot_quaternion == null)
    {
        quaternion = {x: 0, y: 0, z: 0, w:  1};
    }
    else
    {
      quaternion = rot_quaternion;
    }

    // ------ Graphics Universe - Three.JS ------
    let newcube = new THREE.Mesh(new THREE.BoxBufferGeometry(scale, scale, scale), new THREE.MeshPhongMaterial({color: Math.random() * 0xffffff}));
    newcube.position.set(position.x, position.y, position.z);
    scene.add(newcube);


    [...]
Creating in the physics universe
Next, remaining in our createCube function, let’s work on the physics universe. Let’s begin with the Default Motion State part that will define the initial position and rotation of our object in the physics universe :
// ------ Physics Universe - Ammo.js ------
let transform = new Ammo.btTransform();
transform.setIdentity();
transform.setOrigin( new Ammo.btVector3( position.x, position.y, position.z ) );
transform.setRotation( new Ammo.btQuaternion( quaternion.x, quaternion.y, quaternion.z, quaternion.w ) );
let defaultMotionState = new Ammo.btDefaultMotionState( transform );
Next, the geometric structure of collision of our object :
let structColShape = new Ammo.btBoxShape( new Ammo.btVector3( scale*0.5, scale*0.5, scale*0.5 ) );
structColShape.setMargin( 0.05 );
Let’s tackle the calculation of its initial inertia (important if you define an initial rotation for example):
let localInertia = new Ammo.btVector3( 0, 0, 0 );
structColShape.calculateLocalInertia( mass, localInertia );
Next, let’s create our Rigid Body with the elements we just initialized :
let RBody_Info = new Ammo.btRigidBodyConstructionInfo( mass, defaultMotionState, structColShape, localInertia );
let RBody = new Ammo.btRigidBody( RBody_Info );
Next, we add this Rigid Body to our physics universe :
physicsUniverse.addRigidBody( RBody );
This is where the liaison between the physics and graphics universe occurs.
Let’s define this new Rigid Body as a value of the userData.physicsBody property of our newcube 3D cube :
newcube.userData.physicsBody = RBody;
To finish our createCube function, let’s add our newcube cube into the rigidBody_List :
rigidBody_List.push(newcube);
Our createCube function is finally finished! This latter is now able to create 3D cubes in the two physics and graphics universes.
Updating the physical simulation in function of time
Now that we can create dynamic 3D objects, we must be able to advance the physics simulation in function of elapsed time.
For this, let’s create an updatePhysicsUniverse function and its parameter deltaTime.
In the latter, we use the stepSimulation function to update the dynamic simulation as a function of elapsed time :
function updatePhysicsUniverse( deltaTime )
{
    physicsUniverse.stepSimulation( deltaTime, 10 );
}
Remaining in updatePhysicsUniverse, let’s create a for structure to loop on each element of rigidBody_List :
for ( let i = 0; i < rigidBody_List.length; i++ )
{
    //code
}
In our for structure, let’s create two variables to store physics and graphics objects of the current loop tour :
 let Graphics_Obj = rigidBody_List[ i ];
 let Physics_Obj = Graphics_Obj.userData.physicsBody;
We will now extract from the physics universe, the position and the rotation, updated by the dynamic simulation, and inject them into the graphics universe. Thus, the modifications brought by the simulation of the physics universe will be visible in the graphics universe.
Let’s begin by creating a tmpTransformation global variable in the top of our JavaScript module. It will help temporarily store the transformation to be applied during each tour of the loop.
var tmpTransformation = undefined;
Next, let’s initialize this variable in the AmmoStart function, the entry point of our code :
tmpTransformation = new Ammo.btTransform();
Once this variable is created and initialized, let’s return to the for loop of our updatePhysicsUniverse function.
As explained above, let’s extract the position and the rotation of each physics object, to inject it into its equivalent in the graphics universe :
let motionState = Physics_Obj.getMotionState();
if ( motionState )
{
    motionState.getWorldTransform( tmpTransformation );
    let new_pos = tmpTransformation.getOrigin();
    let new_qua = tmpTransformation.getRotation();
    Graphics_Obj.position.set( new_pos.x(), new_pos.y(), new_pos.z() );
    Graphics_Obj.quaternion.set( new_qua.x(), new_qua.y(), new_qua.z(), new_qua.w() );
}
This operation will be carried out for each loop tour, so for each object of the list rigidBodyList.
From now on, at each call of the
updatePhysicsUniverse, our physics and graphics universes will be synchronized !
Finalizing the project
The animation loop – render
Let’s create a classic render animation loop; in it we we call updatePhysicsUniverse :
function render()
{
        let deltaTime = clock.getDelta();
        updatePhysicsUniverse( deltaTime );

        renderer.render( scene, camera );
        requestAnimationFrame( render );
}
Initializing our universes
Next, let’s call our initialization functions initPhysicsUniverse and initGraphicsUniverse in the AmmoStart function:
function AmmoStart()
{
      tmpTransformation = new Ammo.btTransform();

      initPhysicsUniverse();
      initGraphicsUniverse();

}
Creating cubes with createCube
Remaining in AmmoStart, let’s use our createCube function to create dynamic cubes !
Let’s begin by creating a cube with a mass value equal to 0. Thus, it will not be affected by gravity; this will be our support.
createCube(40 , new THREE.Vector3(15, -30, 15) , 0 );
Next, let’s create as much of the cube as we wish, with a positive mass and an initial positive position. The latters will be in freefall until they enter in collision with our “support” cube :
createCube(4 , new THREE.Vector3(0, 10, 0) , 1, null );
createCube(2 , new THREE.Vector3(10, 30, 0) , 1, null );
createCube(4 , new THREE.Vector3(10, 20, 10) , 1, null );
createCube(6 , new THREE.Vector3(5, 40, 20) , 1, null );
createCube(8 , new THREE.Vector3(25, 100, 5) , 1, null );
createCube(8 , new THREE.Vector3(20, 60, 25) , 1, null );
createCube(4 , new THREE.Vector3(20, 100, 25) , 1, null );
createCube(2 , new THREE.Vector3(20, 200, 25) , 1, null );
Finalizing our AmmoStart Function
To finish, let’s add the call of the render function to the end of AmmoStart to start the main loop.
Here is the final state of our AmmoStart function :
// ------ Ammo.js Init ------

Ammo().then( AmmoStart );

function AmmoStart()
{
    tmpTransformation = new Ammo.btTransform();

    initPhysicsUniverse();
    initGraphicsUniverse();

    // base
    createCube(40 , new THREE.Vector3(10, -30, 10) , 0 );

    // falling cubes
    createCube(4 , new THREE.Vector3(0, 10, 0) , 1, null );
    createCube(2 , new THREE.Vector3(10, 30, 0) , 1, null );
    createCube(4 , new THREE.Vector3(10, 20, 10) , 1, null );
    createCube(6 , new THREE.Vector3(5, 40, 20) , 1, null );
    createCube(8 , new THREE.Vector3(25, 100, 5) , 1, null );
    createCube(8 , new THREE.Vector3(20, 60, 25) , 1, null );
    createCube(4 , new THREE.Vector3(20, 100, 25) , 1, null );
    createCube(2 , new THREE.Vector3(20, 200, 25) , 1, null );

    render();
}
Conclusion and Final result
We have reached the end of this first chapter. There remains much to be learned concerning the usage of physics in Three.JS; it’s truly a very vast subject !
Here is an overview of our first project :
The basics of our dynamic project have now been set. It is now possible for us to easily create physics scenes that are a bit more complex!
In this next chapter, we will realize this rather spectacular example:
[…] Understanding and Utilizing Physics in Three.JS with Ammo.js : The Basics Tagsammo.jsammojsgamedevphysicsthree.jsthreejs […]