

In this new chapter, we will apply the theoretical concepts of the previous article.
I strongly advise you to start by reading the first chapter if you haven’t already done so, because we’re going to approach the concepts detailed there in a practical way :
If you are ready, we can start !
So, our goal today is to create a basic Three.js environment made of a simple 3D cube. This can be used as a starting point for any tutorial.
The final code is available at the end of the chapter.
Basic architecture of the project
Let’s get started ! In your favorite code editor, let’s create three files :
- index.html
- script.js
- style.css
Import the library into the project
Then, the next step is to create an ES6 module in our code and load the Three.js library into it.
The import instruction is used to add an ES6 module library to the project :
<script type="module">
    import * as THREE from  'https://cdnjs.cloudflare.com/ajax/libs/three.js/r128/three.module.js';
</script>
Note that it is always possible to import the library in the same way as a classic JavaScript script. However, the module method is recommended since the r106 version of Three.js.
The initialization function of our application
Then, we create an initialization function : init , which will be called at the end of the loading of our JavaScript module. It will be the entry point of our code.
import * as THREE from  'https://cdnjs.cloudflare.com/ajax/libs/three.js/r128/three.module.js';

function init()
{

}
init();
The Scene element of Three.JS
It’s time to get down to business ! In the init function, we initialize a global Three.js Scene variable :
import * as THREE from  'https://cdnjs.cloudflare.com/ajax/libs/three.js/r128/three.module.js';

var scene;
function init()
{
    scene = new THREE.Scene();
}
init();
The constructor of this class does not require any mandatory or optional parameters.
The Three.js WebGL Renderer – The WebGLRenderer class
Then, it is necessary to instantiate a renderer in our code. The WebGLRenderer class allows to display a Three.js scene in a WEB page thanks to the WebGL technology.
To do this, we initialize a global variable in the init function as before :
import * as THREE from  'https://cdnjs.cloudflare.com/ajax/libs/three.js/r128/three.module.js';

var scene;
var renderer;

function init()
{
    scene = new THREE.Scene();
    // ---------------- RENDERER ----------------

    renderer = new THREE.WebGLRenderer( { antialias : true } );
    renderer.setPixelRatio( window.devicePixelRatio  );
    renderer.setSize( window.innerWidth, window.innerHeight );
    document.body.appendChild( renderer.domElement ); // we add the HTML element to the HTML page
}
init();
WebGLRenderer – Constructor
The constructor of this class accepts a JavaScript object as an optional parameter in order to configure our WebGLRenderer instance.
Some options can be enabled, in our case, it is the antialiasing, a feature to smooth the contours of 3D objects.
WebGLRenderer – setPixelRatio
This method is used to set a ratio between the screen size and the number of pixels.
Usually and as in our example, the value defined in parameters is equal to the native ratio of the current page of our web browser.
WebGLRenderer – setSize
This method resizes the HTML element in which the 3D rendering is displayed according to the pixel ratio and the height/width size given in parameters.
WebGLRenderer – domElement
This property represents the HTML entity to add to our WEB page. The 3D rendering will be displayed in this HTML element.
In our example, we use a JavaScript function to add this element in our page.
The Camera of our project – PerspectiveCamera
We choose to use a PerspectiveCamera. This camera is designed to recreate the projection mode based on the perspective of the human vision.
As usual, in the init function :
[...]
var camera;
function init()
{
[...]
// ---------------- CAMERA ----------------
camera = new THREE.PerspectiveCamera( 75, window.innerWidth / window.innerHeight, 1, 10000 );
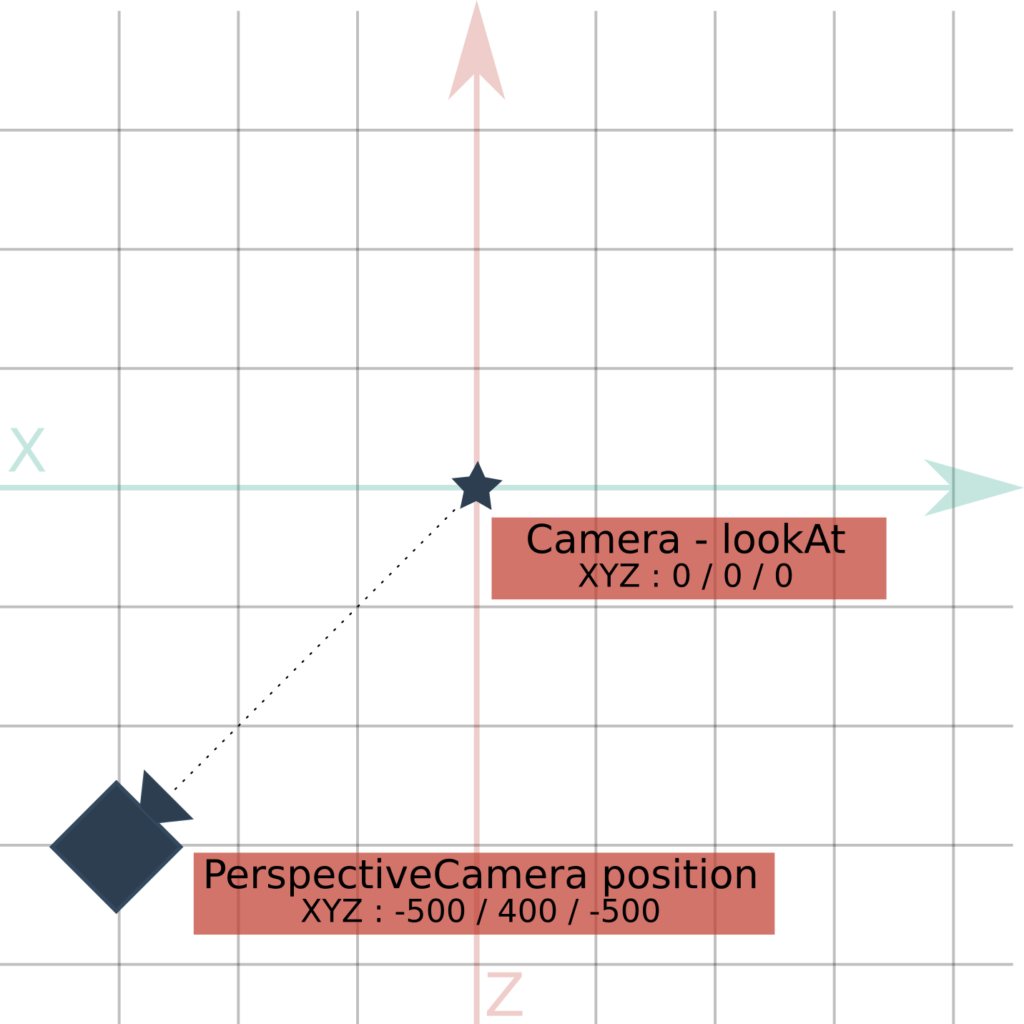
camera.position.set( -500, 400, -500 );
camera.lookAt(new THREE.Vector3(0,0,0));
scene.add( camera );
}
init();
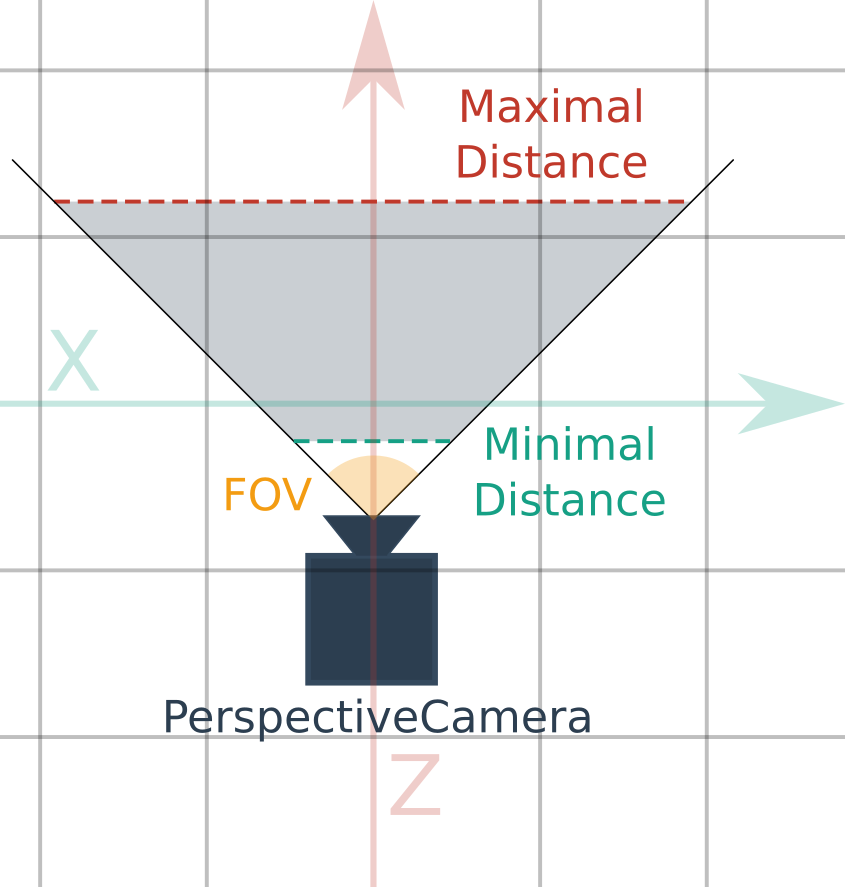
PerspectiveCamera – Constructor
The constructor of this class accepts four parameters :
- FOV – Field of View (Angle of aperture of the lens)
- Aspect – The projection ratio (usually Width / Height)
- Minimum Distance – Minimum viewing distance of the camera
- Maximum Distance – Maximum viewing distance of the camera
PerspectiveCamera – position.set
Each object in the Three.js 3D universe has a position on three axes, XYZ. These values allow to position an element in the scene.
Thanks to the set method, it is possible to define the position of our camera in the scene with three arguments : The X, Y and Z values.
Perspective Camera – lookAt
Just like the position values on three axes, each object in the 3D Three.js universe has a rotation value on the X, Y and Z axes.
It is possible to orientate our camera by changing these values, but it is much easier to use the lookAt method.
The latter requires only one argument, the XYZ coordinates to which the camera must be oriented.
Add the camera to our scene
In Three.js, each object of the universe offers a method add .
This method allows to establish a parent/child relationship between two elements. So, to add the camera to the list of children of our scene, we will use this feature.
The lighting of our scene
A Three.js universe is composed of elements that most often need to be lit. There are several lighting available in the library, we will use two of them.
Global lighting – AmbientLight
This lighting illuminates all the objects in the scene equally. Still in the init function, let’s add an instance of AmbientLight in the scene :
// ---------------- LIGHTS ----------------

var ambientLight = new THREE.AmbientLight( 0xcccccc, 0.2 );
scene.add( ambientLight );
The constructor of this class takes, in our project, two optional parameters :
- Color of Lighting – Optional – 0xFFFFFF by default
- Lighting intensity – Optional – 1 by default
Directional lighting : DirectionalLight
Most of the time, a simple global AmbientLight is not enough because it does not allow to distinguish correctly the polygons of our 3D objects.
Indeed ! With AmbientLight, each face of the 3D objects is lit equally, so it is impossible to simulate natural light correctly.
DirectionalLight simulates a light source emitted in one direction, and is thus able to create light effects.
var directionalLight = new THREE.DirectionalLight( 0xffffff, 0.6 );
scene.add( directionalLight );
The DirectionalLight contructor works exactly like the AmbientLight contructor.
A 3D Cube
In this chapter, our goal is to create a 3D view of a rotating cube. So, in addition to the elements already added, we need to instantiate a Mesh variable to create our cube.
As you already know, a Mesh is composed of the combo of a Geometry and a Material.
We create a global variable for our cube, and we initialize it in the init function :
// ---------------- 3D CUBE ----------------

const geometry = new THREE.BoxGeometry( 150, 150, 150 );
const material = new THREE.MeshPhongMaterial( {color: 0x00ffff} );
cube = new THREE.Mesh( geometry, material );
scene.add( cube );
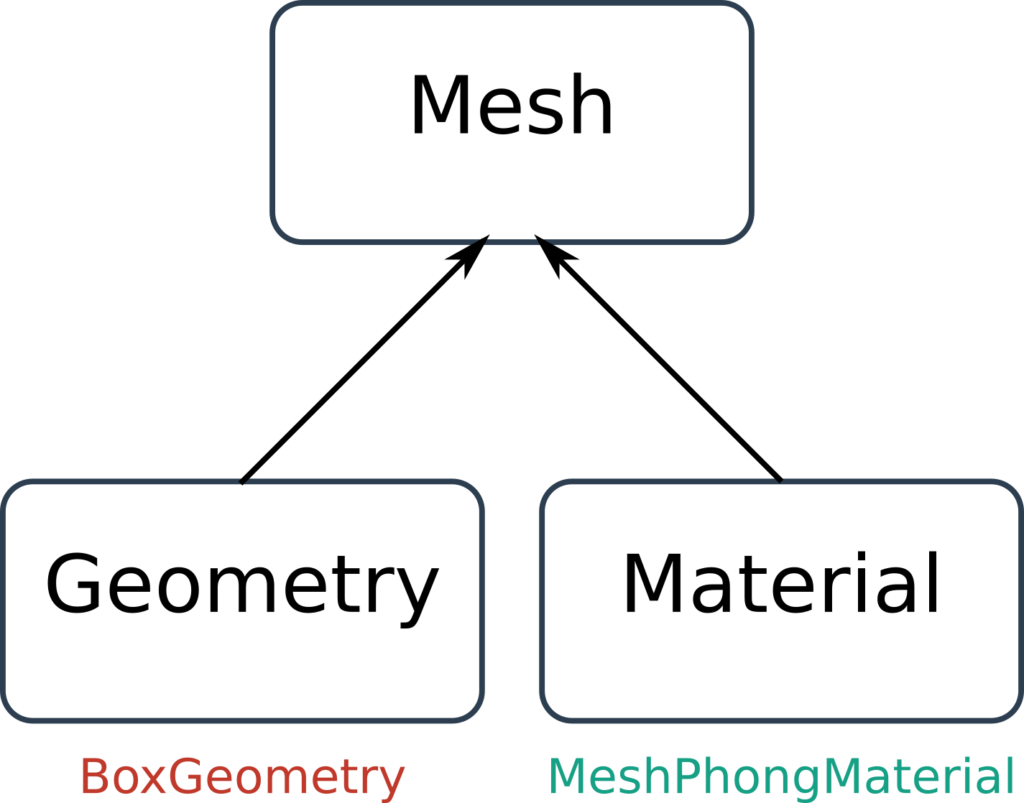
Our Mesh is composed of a BoxGeometry and a MeshPhongMaterial.
BoxGeometry – A cubic Geometry
The first thing to do is to create a Geometry , the shape of our cube.
For this, we use the BoxGeometry class. This class allows us to instantiate a rectangular Geometry according to three parameters :
- Width – Size of the structure on the X axis
- Height – Size of the structure on the Y axis
- Depth – Size of the structure on the Z axis
Thus, by defining three equal values, it is possible to create a cubic Geometry.
MeshPhongMaterial – The visual aspect of our Mesh
The next step is to create the Material of our cube. There are several types of Material available in Three.js, we choose one of the most used, MeshPhongMaterial.
This type of material is mainly used for its shiny aspect, unlike the others which are mainly matte.
The constructor of this class accepts a JavaScript object as an optional parameter in order to configure our MeshPhongMaterial instance.
We use this functionality to define a texture color in hexadecimal.
The final Mesh object
Our cube is finally created and ready to use ! Like any object in the scene, it has position and rotation values, which we choose not to modify for the moment.
The cube will be created by default at the center of the scene (0, 0, 0) XYZ.
Main loop and 3D rendering of the scene
Phew ! Our initialization function is finally finished !
All the elements and actors of our Three.js universe are now created, we only have one step left : The main animation loop.
This main loop will allow us to perform actions at each frame. One of these actions concerns the 3D rendering, which consists in displaying our scene as seen by a camera.
Creating the main loop
Let’s create a render function in our JavaScript module, this function will be used as the main loop and will be in charge of performing actions at each frame of our application.
function render()
{
    [...]
}
Updating the 3D rendering
To do this, we use our WebGLRenderer object instantiated in the init function. This instance provides a render method (not to be confused with our render function !), which takes two parameters :
Scene– A Three.js sceneCamera– A Three.js camera
Let’s use this method with our variables :
function render()
{
    renderer.render( scene, camera );     // We are rendering the 3D world
}
Rotating the cube
We want to rotate our cube on two axes ( X and Y ).
As a reminder, each object in the scene has a rotation value for each axis X, Y and Z.
We increment at each turn of the loop, the value already effective on the X and Y axes, to make the cube rotate.
function render()
{
    // rotating the cube each render tick
    cube.rotation.x += 0.005;
    cube.rotation.y += 0.01;
    renderer.render( scene, camera );     // We are rendering the 3D world
}
Finalization of the loop
The last step of this project is to finalize the main loop system.
Our render function is now able to rotate the cube and render our scene in the WebGLRenderer canvas.
However, let’s not forget that this function is not used yet ! The init function is the entry point of our JavaScript module. We must call the render function at the end of init as below :
[...]
function init()
{
        [...]
    // ---------------- STARTING THE RENDER LOOP ----------------
    render();
}
function render()
{
    [...]
}
So when the initialization phase is over, the render function will execute. To make it behave like a loop we add a last line at the end of the render function :
function render()
{
    // rotating the cube each render tick
    cube.rotation.x += 0.005;
    cube.rotation.y += 0.01;
    renderer.render( scene, camera );     // We are rendering the 3D world
    requestAnimationFrame( render );    // we are calling render() again,  to loop
}
requestAnimationFrame is a JavaScript function suitable for our need, it will make the render function execute in a loop.
Final result and project code
See the Pen Hello World by Thomas (@thomassifferlen) on CodePen.
Feel free to download the complete Three.js University guide to progress even faster !
This article only touches on the basic concepts of Three.js ! In chapter 2 of the downloadable guide, you’ll find out how to configure the different concepts I just presented in detail !
You can download the complete guide here :
The next step of our 3D adventure concerns the Geometry classes, follow the guide :
[…] Chapter 2 – A Hello World with Three.JS […]
[…] Chapter 2 – A Hello World with Three.JS […]
[…] Chapter 2 – A Hello World with Three.JS Chapter 3 – The principal types of Three.JS Geometry […]
when i follow the same steps all i see on my site is a black screen with a white border around it
my code:
Three.js Test
import * as THREE from ‘https://cdnjs.cloudflare.com/ajax/libs/three.js/r128/three.module.js’;
var scene;
var renderer;
var camera;
function init()
{
scene = new THREE.Scene();
// —————- RENDERER —————-
renderer = new THREE.WebGLRenderer( { antialias : true } );
renderer.setPixelRatio( window.devicePixelRatio );
renderer.setSize( window.innerWidth, window.innerHeight );
document.body.appendChild( renderer.domElement ); // we add the HTML element to the HTML page
// —————- CAMERA —————-
camera = new THREE.PerspectiveCamera( 75, window.innerWidth / window.innerHeight, 1, 10000 );
camera.position.set( -500, 400, -500 );
camera.lookAt(new THREE.Vector3(0,0,0));
scene.add( camera );
// —————- LIGHTS —————-
var directionalLight = new THREE.DirectionalLight( 0xffffff, 0.6 );
scene.add( directionalLight );
// —————- 3D CUBE —————-
const geometry = new THREE.BoxGeometry( 150, 150, 150 );
const material = new THREE.MeshPhongMaterial( {color: 0x00ffff} );
cube = new THREE.Mesh( geometry, material );
scene.add( cube );
// —————- STARTING THE RENDER LOOP —————-
render();
}
function render() {
// rotating the cube each render tick
cube.rotation.x += 0.005;
cube.rotation.y += 0.01;
renderer.render( scene, camera ); // We are rendering the 3D world
requestAnimationFrame( render ); // we are calling render() again, to loop
}
init();
i would like some feedback as to what i am doing wrong
Hello ! Thanks for your comment haha 🙂
I just tried to run your code and I have found a single problem :
Don’t forget to declare your cube variable before using it : something like var cube; under your variables
With this edit, your code seems to work on my Chrome, I hope this helps ! 🙂
Thomas
PS : The console is very helpful for these little mistakes !
hello
hello
[…] Chapter 2 – A Hello World with Three.js […]
[…] thomassifferlen 4 commentaires Available in English […]