
Before starting this big project, if you are still a beginner with Three.JS, I highly suggest you first master the basic concepts explained in our training courses :
If you are ready, let’s begin!
Introduction and presentation of the project
In this grand tutorial, we will develop together step-by-step a Tower Defense game with Three.JS!
Tower defense (TD) is a subgenre of strategy games where the goal is to defend a player’s territories or possessions by obstructing the enemy attackers or by stopping enemies from reaching the exits, usually achieved by placing defensive structures on or along their path of attack.
Wikipedia
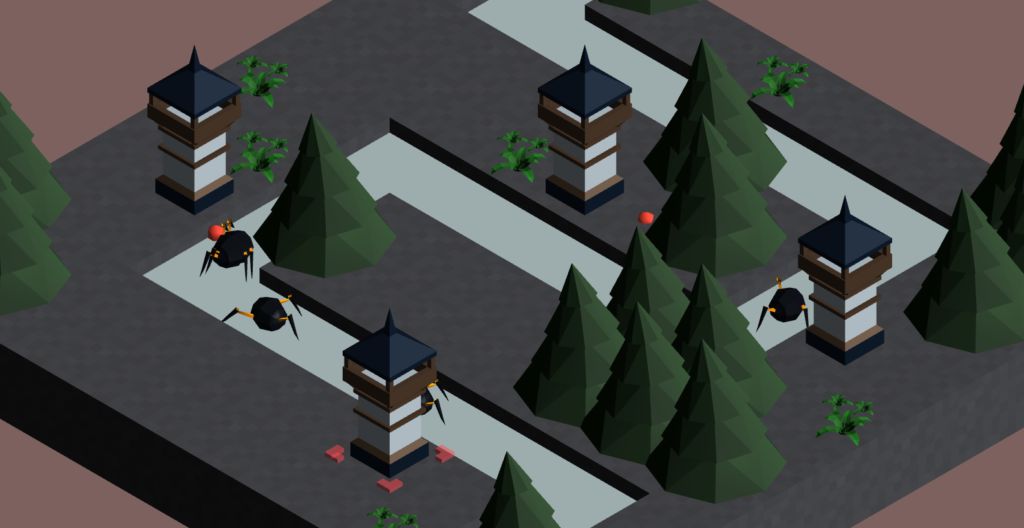
Thus, in a 3D orthographic styled world, we develop a universe composed of a forest path, which must be defended from waves of enemies by the towers.
The goal of the game is to prevent the enemies from reaching the end of the path.
This tutorial is available in video form !
During the different phases of development, we will cover the following themes:
- Basics of Three.JS
- Loading 3D models
- Animating 3D models
- Raycaster
- Programming oriented object and basic JavaScript
Creating a foundation universe
Let’s begin the first step of our project! Let’s create an index.html file:
<head>
      <meta name='viewport' content='width=device-width, initial-scale=1.0, maximum-scale=1.0, user-scalable=0' />
      <style>

      body
      {
        margin: 0; touch-action: none;
        background-image: -webkit-gradient(linear, 0 0, 100% 100%, color-stop(0, #877fa8), color-stop(100%, #f9ae91));
        background-image: -webkit-linear-gradient(135deg, #877fa8, #f9ae91);
        background-image: -moz-linear-gradient(45deg, #877fa8, #f9ae91);
        background-image: -ms-linear-gradient(45deg, #877fa8 0, #f9ae91 100%);
        background-image: -o-linear-gradient(45deg, #877fa8, #f9ae91);
        background-image: linear-gradient(135deg, #877fa8, #f9ae91);
      }

          canvas { width: 100%; height: 100% ; touch-action: none;}
      </style>
      <script  type="module"></script>
</head>
<body>
</body>
Next, in this foundation of code, let’s attack the concrete in the beacon script !
Let’s begin by importing Three.JS and MapControls into our project and creating some variables:
<script  type="module">

    import * as THREE from '../js/build/three.module.js';
    import { MapControls } from '../js/examples/jsm/controls/OrbitControls.js';

    // Basic Threejs variables
    var scene;
    var camera;
    var renderer;
    var clock;
    var controls;

    [...]
Next, let’s create an init function. The latter will be called at the end of our JavaScript code; this will be the entry point of our project:
<script  type="module">
[...]

function init()
{

}

init();
</script>
In this function, we will initialize the previously created variables as well as the foundations of our Three.JS universe.
The Basic Actors
As a reminder, do not hesitate to refresh your memory on the basic concepts of Three.JS:
Let’s begin with the variables clock and scene, respectively of the Clock and Scene types :
function init()
{
  clock = new THREE.Clock();
  scene = new THREE.Scene();
}
Next, our 3D rendering engine renderer, of the WebGLRenderer type.
Still in the init function :
// ---------------- RENDERER ----------------
renderer = new THREE.WebGLRenderer( { antialias : true ,  alpha: true} );
renderer.setPixelRatio( window.devicePixelRatio  );
renderer.setSize( window.innerWidth, window.innerHeight );
document.body.appendChild( renderer.domElement );  // we add the HTML element to the HTML page
Let’s follow with the initialization of the camera variable. In this project we will use OrthographicCamera :
// ---------------- CAMERA ----------------
const aspect = window.innerWidth / window.innerHeight;
const frustumSize = 10;
camera = new THREE.OrthographicCamera( frustumSize * aspect / - 2, frustumSize * aspect / 2, frustumSize / 2, frustumSize / - 2, 1, 1000 );
camera.position.set( -5, 5, -5 );
camera.lookAt(new THREE.Vector3(0,0,0));
scene.add( camera );
Controlling the camera
Next, let’s initialize an instance of MapControls to control the camera. As a reminder, MapControls is a class from the officials add-ons of Three.JS :
// ---------------- CAMERA CONTROLS ----------------
controls = new MapControls( camera, renderer.domElement );
controls.enableDamping = true; // an animation loop is required when either damping or auto-rotation are enabled
controls.dampingFactor = 0.05;
controls.screenSpacePanning = false;
controls.minDistance = 2;
controls.maxDistance = 20;
controls.maxPolarAngle = Math.PI / 2;
If you would like more information on basic camera control :
Our basic variables are finally initialized! Now let’s get to filling out our scene.
Lighting in the Scene
Let’s begin with the lighting of our scene. As you may know, the lighting of the scene is most of the time indispensable for the 3D objects to be visible.
Still in our init function :
// ---------------- LIGHTS ----------------
var ambientLight = new THREE.AmbientLight( 0xcccccc, 0.2 );
scene.add( ambientLight );
const directionalLight = new THREE.DirectionalLight( 0xffffff, 0.6 );
directionalLight.position.set( - 1, 0.9, 0.4 );
scene.add( directionalLight );
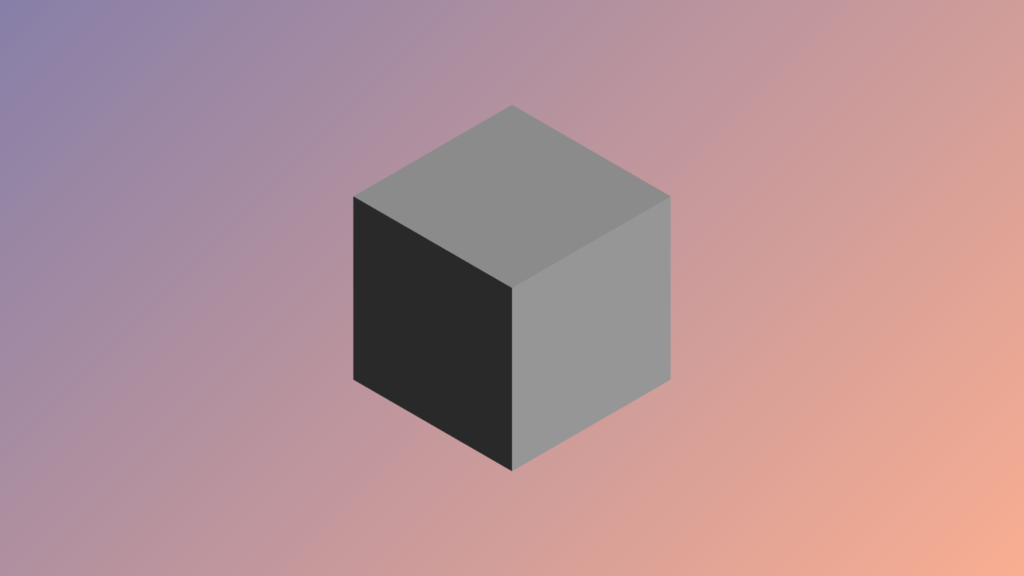
A cube in the center of the scene
Let’s continue the code of our init function with the creation of a cube in the center of the scene:
var cube;

[...]

const material = new THREE.MeshLambertMaterial();
const geometry = new THREE.BoxGeometry( 2, 2, 2 );
cube = new THREE.Mesh( geometry, material );
scene.add( cube );
The principal animation loop
To finish, let’s occupy ourselves with the principal animation loop. Let’s create a basic render function :
function render()
{
    var delta = clock.getDelta();            //get delta time between two frames
    var elapsed = clock.elapsedTime;    //get elapsed time
    controls.update(); // only required if controls.enableDamping = true, or if controls.autoRotate = true
    renderer.render( scene, camera );     // We are rendering the 3D world
    requestAnimationFrame( render );    // we are calling render() again,  to loop
}
Don’t forget to call render at the end of our init function to start the main loop:
function init()
{
    [...]
    // ---------------- STARTING THE GAME MAIN LOOP ----------------
    render();
}
Final Result
Download the final code : Github.
Congratulations, you have arrived at the end of this first part! Here is the state of our project at the end of this first article:
In the next part, we will study how to implement the functionalities linked to the game map; stay tuned!
[…] Creating a Tower Defense game with Three.JS – Part 1 […]
[…] Creating a Tower Defense game with Three.JS – Part 1 […]